Wave Accounting has introduced a new Reconciliation feature. This is big news for me, since I’ve been on Wave’s case for close to two years about giving users a way to do a reconciliation.
Understanding Wave’s Transactions Page
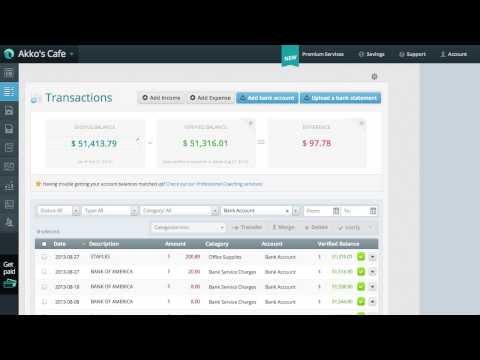
The first thing you have to know, especially if you’re not a Wave user, is that a main part of Wave is its Transactions page. This is where most transactions in Wave can be found, and it’s also where a reconciliation can be performed (Figure 1).

Figure 1: Wave’s Transactions page
Another thing you should know is that when transactions are imported, whether via bank feed or a manual upload of a bank statement file, they all appear in the Transactions page. This means that if you’ve entered a transaction into Wave before the import, you’ll end up with duplicate transactions that you’ll most likely need to merge, like the ones in Figure 2. I say this because Wave does have the ability to detect duplicates and auto merge, but in my tests, this rarely happened.

Figure 2: If you enter transactions manually, you’ll often need to manually merge duplicates
But I’m not going to dig in any deeper into the matching and categorization of transactions. Instead, I’m going to talk about what happens when you want to verify that the transactions found in Wave match those found in your bank statement.
To verify a transaction in Wave is as basic as selecting the check mark, as shown in Figure 3.

Figure 3: Click a check mark to verify a transaction
Disappearing transactions
As you verify transactions, you may notice that they disappear. If this happens to you, this is because your view is set to Unverified. To see all transactions, you can toggle the field to All Statuses (Figure 4).

Figure 4: Toggle to view All Statuses
Reappearing transactions
If you’re a speed demon, like me, and love to quickly click away, you may have transactions reappear. This is part of Wave’s new “ghost mode” feature, created to ensure you’re not clicking too fast and taking the time to verify transactions. Click too fast, and the transactions come back to haunt you.
I’m joking. If transactions reappear, it’s a result of new transactions not being able to be verified before the interface has had a chance to register the previous verification. (If you watch the video, you’ll see what I’m talking about). Honestly, it’s not a big deal, since I don’t think you’ll be clicking that fast anyway. But if you do, the work-around is to select the check boxes beside the transactions and click the verify button, as shown in Figure 5.

Figure 5: To quickly verify transactions, select the check boxes beside them and click the Verify button
Accessing the Reconciliation View
Once transactions are verified, you may think your job is complete, but verification is only part of the reconciliation process. This is where the new Reconciliation view comes into play. If you filter the view to only show your bank account, you’ll enter the Reconciliation view (Figure 6).

Figure 6: Filter the accounts to show a single bank or credit card account to get to the Reconciliation view
Filtering the dates for the Ending Balance
In the Reconciliation view, you’ll have an opportunity to enter an ending balance. Something that tripped me up at first was the date, because I wanted to enter a balance as of March 31, 2013, not February 21, 2014. I tried in vain to click the date to change it. What’s the all-to-obvious solution? Use the Date filter to change the To date, as shown in Figure 7.

Figure 7: Adjust the date filters to get an Ending Balance date
See how each verified transaction affects your balance
As Figure 8 demonstrates, if a transaction is verified, it will affect the balance. If it’s not verified, it won’t.

Figure 8: Notice how unverified transactions (those without a green check mark) don’t affect the balance
What about verified but uncleared transactions?
A concern of mine with how the Reconciliation view works is that it isn’t accurate when you have verified – but uncleared – transactions, like a check that was written but not cashed, or an expense paid with a credit card that hasn’t yet been posted. Well, you can actually drag the transactions to a different position, as shown in Figure 9.

Figure 9: A transaction being moved (this changes its date and unverifies it)
This results in the date being changed and the transaction becoming unverified, so you have to make sure to reverify the transaction if you do this. You should be careful, as changing the date can change the period within which income, expenses, and sales taxes fall, thus potentially messing up your reports.
Reconciliation Summary
If you look at the top of the Transactions page, you can now see the boxes for the Ending Balance, Verified Balance, and Difference. Clicking on the Verified Balance and Difference boxes will reveal Withdrawals and Deposits details. If there’s a difference between the Verified Balance and the Ending Balance, it will be displayed in the Difference box.

Figure 10: Click on the Verified Balance and Difference boxes to see details
Saving reconciliations
One thing I wondered was if reconciliations can be saved. In a way, they can be. If you go to a different date, the Ending Balance will be cleared. If you go back to a date where you entered an ending balance, it will still be there. So, a reconciliation is in a sense saved, but you need to know the date of your previous reconciliation in order to see it; there’s no history of reconciliation dates that you can view. There are also no reconciliation reports available.
Final Thoughts
Overall, I’m happy with the Reconciliation feature in Wave
Can the Transactions page be improved? Yes, I wish there were better matching algorithms, more control over automation, and more flexibility in which accounts can be used. However, I do have to give credit where credit is due and commend Wave on finally giving us a way to reconcile our books. Keep up the good work Wave!